Friday, January 25, 2013

The "Cage Free" Myth

Coles is so proud of their "cage-free egg policy" that they wrote an article about it in their free magazine, and I just couldn't stop myself from looking into it. They say, quote:

"We consulted many experts and set a target at 10,000 birds per hectare for cage-free layer hens. It was about finding a balance between egg affordability and welfare."

Oh really? I think you need better experts. Well, here's a bit of a heads up for you consumers: 1 hectare is 10,000 square meters. Do the math. That's one square meter per bird. (In contrast, the Free Range Farmers website page on Hen Welfare describe a 1500 hen limit per hectare to be considered free range for commercial producers, and all FRFA member farms have a stocking density limit of 750 hens per hectare.)

http://www.freerangefarmers.com.au/hen-welfare.html

Anyone who knows anything about chickens knows that they scratch at the ground and poke about for bugs, grass, etc. They tear up the ground pretty good in a few days. If you had *4* hectares and rotated the birds, you wouldn't have enough room to give the ground enough time to recover, to give the chickens the best possible grazing. They go on to say:

"It would be detrimental to drive down to lower density levels if it meant ending up with eggs costing six or seven dollars."

You mean... like the cost of your free range eggs? They vary anywhere from $5 to $7, depending on what brand you get. And, right back to the Free Range Farmers website, they say free range isn't as free range as you might think:

"The Egg Corporation admits that a third of eggs labelled as free range are from intensive farms, some with 40,000 and even up to 100,000 hens per hectare."

Can I get a big ol' WTF here? With a heaping side serving of "Why am I your customer again?"

It makes me wish I had the room to raise my own chickens.

So, consider this your consumer wake up call for the week. I, for one, will continue buying my free range eggs from the local guy, for 3 dollars a dozen.

Thursday, January 24, 2013

Say Cheese... Part 1

So, my latest experiment has been making a sort of hard cheese without using cheese cultures like most hard cheeses have. It all started when I decided to try making ricotta salata, after I was given two liters of whole, un-homogenized milk by a friend cleaning out her fridge before she went on holiday. I followed the directions, but I do think they could have been a little clearer about the drying process.

I left the cheese to dry out on a plate in the fridge, rubbing it periodically with salt, as per the directions. I wasn't sure what to expect, but what I got was this odd, hard, crackly skinned yellow hocky puck type thing. It looked like something that had hitched a ride in from another planet. Not very appetizing looking, but it was certainly some kind of happy accident. Once I'd sliced it open, I realized that under the weird rind, the inside was a very smooth, fairly dry, salty firm cheese that was extremely tasty. Especially with fresh, homegrown cherry tomatoes. Oh yes.


Hubs demanded I make more of it. (Partly, I think, because he wants me to impress at the Saturday arvo dinner we're having with friends.)

So here I am, at round 2. I bought 4 liters of milk this time (four 1 liter bottles, same kind of milk; they were discounted!), and made two batches, following the same cooking directions. I did do it slightly differently at the end though:

I pressed them for a while in the ricotta basket, like the instructions said, but then I pulled them out, salted them, wrapped them in a single layer of cheesecloth, then pressed them again, using a small plastic cheese dip container saved from who knows when. I'd poked a few holes in the bottom of the container and weighted it.

Once firm, I pulled the cheeses out, placed them on plates, and I've been rolling them in salt and drying their plates periodically all afternoon. I'm going to see what kind of rind I can get on these babies by Saturday. Check them out:


The salt is doing a good job drawing out the extra moisture, though I think one did end up getting pressed longer than the other. One is a little softer to the squish (yes, that is an official technical term: a "squish" being the act of gently squeezing an object with the fingertips while attempting to avoid causing damage.)

One is already beginnign to show signs of developing the yellow rind. We'll see how it goes. I'll post an update on the day of reckoning. Oh yeah, and I guess I should post the recipe, shouldn't I? It's below.

Ricotta Salata

Whole Milk Ricotta

2L whole milk
1 tsp citric acid diluted in 1T water
1 tsp salt

1ml of calcium chloride

1. Add calcium chloride and salt to milk in a pot
2. Heat milk to 90C while stirring constantly. Once you have reached 90C, take pot off the heat.
3. Stir in citric acid.
4. Ricotta should start to curdle immediately.
5. Leave ricotta to cool 1-4 hours.
6. After 1-4 hours the ricotta should be firm enough to scoop into the draining basket.
7. Leave ricotta to drain 20 minutes in the basket before serving.


Happy cheese making! 

Monday, December 31, 2012

Bring On 2013!

Well! The holidays are almost over, and here, on New Years Eve, I am left trying to find the words to write up a newsletter for everyone. I guess the best I can do is tell it like it is. :)

The best Christmas present I could have ever asked for was given to me with out any real fuss: my permanent partner visa has been granted! The next step in my immigrants journey is getting my dual citizenship set up. I look forward to an even more secure future now. :)

I achieved a few goals in 2012, and have more planned for 2013.

2012 was many things: it marked our second anniversary, my second year living in Australia, a three week long trip to visit home to see all my wonderful friends and family again, my goal of achieving at least some SS values. It was success in my garden, it was a renewal of old skills, and the learning of new skills. I had succeeded in sourcing suppliers of free range eggs and chicken, grass fed beef and, most recently, fresh milk. I had finally made some efforts at coming out of my usual seclusion to meet people and make new friends in the area.

I have all of these successes now to help me further build my confidence for the new year.

My goals for 2013 include building my much wanted cold smoker, building and establishing a top bar hive, increasing my garden yields even further (and perhaps finding more customers), finish my hand pieced, hand sewn quilt, finish sewing the doonas for winter bedding, make more friends and connections and, of course, continue learning all that I can. We also look forward to another trip home in September, assuming everything goes to plan, and we think it will.


I am happy. I have a loving husband who I'd do anything for and who I love with every fiber of my being, I have great friends, new and old, and I have great things to look forward to.

Here's hoping you all have a fantastic new year!

Friday, October 26, 2012

Don't Be Wasteful

Hey folks, Living and Learning here again, and I just want to point out some interesting facts to you about using off cuts. Off cuts being, of course, the pieces of an animal we don't normally think about using, what's often processed for you, so you never even get the chance to think about using them.

For instance, chickens don't just consist of wings, legs and breasts. They have necks, backs and feet (and, of course, organs), all of which are just as good for cooking as the other parts they market. You can simmer them for broth, soup, stock, the meat shreds easily for meals, sandwiches and snacks, the bones can be boiled until soft and then crushed and dried in the sun to be used as a garden additive, the feet are used to make broth as well, and the organs can be used in numerous recipes for extra yummy nutrition.

Here's what I did the other day. I had the wings, necks and backs left over from from those two roosters I slaughtered in my yard. I bunged them in Hal, my new stainless steel slow cooker with some hot water, and simmered them until the meat was falling off the bones. Then i pulled the meat chunks out, strained the broth, and while the onions, carrots, garlic, and herbs that I added to it gently stewed into a fragrant broth, I stripped the meat off the bones. Check it out:


All the stuff on the left is skin and bones. And on the right? That's all meat. You see that? There's a load of meat there. There's like, a meal for four. Sandwiches for lunch. Snack time heaven. And all that you can usually get for way cheaper at a store than you can buy a whole chicken for. Pressed for cash? Get the cheap cuts like this. (Granted, I did get these for free, but I did have to kill and process them on my own as well.)

Food for thought.

Friday, September 21, 2012

Gearing Up To Grow

Time for me to catch you all up on what I'm doing here. :)

Re: Snow Peas

I'd put up stakes around the raised box when I'd first sowed the combination of "Alderman" and "Mammoth Melting" peas wholesale. My reasoning was, well, this is an older packet of seeds and a new packet of seeds, so what grows, grows, what doesn't won't matter. The plants that are there now are about 12-18 inches high, and it helps that I tied bean netting to the stakes so they can climb on it. They are loving it.

Re: Nasturtiums and Calendula

All the nasturtiums and the one calendula plant I had planted in the garden box (with the peas) have over wintered splendidly, and I've got yellow flower heads already, and soon will have the orange, red and magenta blooms from the nasturtium. I've also started more calendula in the greenhouse, and more nasturtiums will follow. I'll attempt to sell the extra plants.

Re: Spinach and Silverbeet

The spinach is out of control. I don't have a row of spinach anymore, I have a freaking HEDGE. I'm going to let it go to seed, collect the seeds, and then grow more later.

The silverbeet has performed admirably for a plant that was strictly a volunteer. I'll be removing it though and growing it in rows instead, probably around the house.

Re: Garden Allotments

I am over run by weeds! Luckily, the ground is still soft, and they are relatively easy to pull. I think I'm going to do battle with the weeds by using black weed cloth to block them. Just weed the areas I want to cover, till them over with sheep poo or whatever, rake into mounds/rows, cover with the weed cloth and stake it down. Cut X's in wherever I want an opening for a plant, and away we go. Maybe cover with a bit of mulch.

Re: The seeds I planted before I left for holiday

They failed. Every single one. No chives, no chamomile, no red silverbeet. I was very disappointed. I am over it now, and plan to grown other stuff.

And, last but not least, I got more seeds!

Radish, Daikon-Miyashige
Silverbeet, Fordhook Giant
Silverbeet, Rainbow Chard
Capsicum, Purple Beauty
Chili, Hungarian Yellow Wax
Bush Bean, Borlotti
Bush Bean, Cherokee Wax
Runner Bean, Scarlet Emperor
Tomato, Hillbilly
Tomato, Cherokee Purple

I look forward to this new growing season. :)


Cheers!

Saturday, September 8, 2012

How to Prune a Grapevine

My grapevine. It's about 25 years old, according to my husband, and as you can see, I haven't yet pruned it. Since it's still looking pretty dormant (no signs of swelling buds or other life) it's still safe for me to prune it back.

Pruning in the commercial sense basically "stresses" the vine, and encourages it to produce a larger yielding of fruit. Great if you are a vineyard owner, or wanting t
o make your own home wines.

Pruning in my case, though, means keeping the vine in a manageable state; grape vines especially are notorious for growing wildly in all directions in a huge mess, and since I am trying to train it on the fence to keep it tidy, this means I'm going to spend some time picking and choosing the direction I want it to grow in.

This requires clipping back last years growth.
 
As you can see here, this vine has grown in tandem with a honeysuckle, which, for the majority of it's years, was not to it's advantage. I cut the honeysuckle back severely about two years ago, and the vine has been doing much better. The honeysuckle seems to be doing just fine as well.


So! Here's what to look for when you're pruning.

The section of the trunk of the vine with all the stringy gray-brown bark is the older wood, usually two or more years old. Generally, this won't bear fruit, or even sprout much, though if you have a lot of grapes, you will encounter vines that throw out suckers like there is no tomorrow. Just scrape those off before they lignify (harden into proper fruit wood).


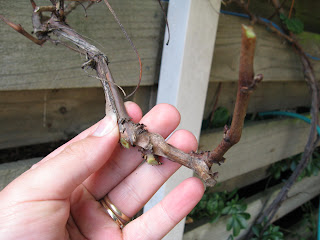
The brown lengths of stem are the fruiting wood. They are last years growth. Every nodule (seen as the slightly swollen "knuckles" along the length of the stem) is a bud. Now, I won't go into all the details about the buds, but what you really need to know is that if these are viable, they will sprout more greenery and stems.

You can control how the vine grows by choosing the buds you want to stay and cutting out the rest. This not only directs the vine, but gets rid of anything that would create much more tangled growth. (Another good idea is to have twine or green gardeners tape handy to secure the vine to your trellis/fence/stake and support it, while training it to grow in that particular direction).
 

 I'll use this section as an example.

What I have here is a forked section of old wood.

One section (seen growing off the bottom of the picture) peters out into a dead branch, has one small (less than a pencils thickness) stem which is sickly looking, and no other viable options.

The other fork is a short spur with two nice looking stems (look for ones about as thick as a pencil or a little more; they are generally going to give good results).

One stem is right at the end of the spur (you can just about see the dead, dry remnants of last years pruning), but the other is in a bad spot: too close to the branch and growing back on itself.
 

 So, that one that's growing close to the fork? Just cut it off as close to the old wood as you can.

 And, because the other branch of the fork ended in dead material and had only a sickly looking stem, just cut that section off too.

Prune your chose stem them to give it two or three buds, and then secure the branch of the vine where you want it. Continue with this process all over the vine until it's all pruned.

 You now have a vine that will grow relatively neatly, and still put on quite a bit of fruit if the season is good. I'll get a kilo or two of grapes off this skinny old vine.

 The pile of grape cuttings, reading for grafting or sprouting as you see fit.

Because I want have more grapevines growing along the fence in future years, I'm going to attempt to plant some of the stronger stems and see if they will sprout. If they do, I'll plant them along the fence and train them as I do the old vine.

Happy pruning, and have a great weekend!

Friday, August 31, 2012

Safe and Sound At Home

Arrived home safely! Well, actually, we arrived home safely yesterday, getting in the house at about 3:30pm Thursday. The flights were much better; in all three planes we had the third seat to ourselves, so we had space to move about and put stuff, the planes were cooler, and I was actually able to get some sleep. All our baggage came through without much issue, just the usual charges for being overweight (you're only allowed 23kg of baggage total, and each bag we had was near or well over that limit; tis just a fact of moving house). I have more of my clothing now, my precious belongings, various cosmetics and, best yet, my jewelry! I can be blingin' once more. :D

First thing upon entering home that I notice is how skanky the house smells. I know we've been gone for three weeks, but that particular smell is one I associate closely with rotting vegetation. Sure enough, not one but TWO of the squashes I had stored in the kitchen cabinet had decided to liquify. The sheer audacity of them! :P I spent my first hour home cleaning up a huge mess, because they had liquified, and the watery stuff resulting of that had seeped underneath the bag of rice (thankfully it missed the paper flour and sugar bags), all along the front of the cabinet under the drinking glasses and mugs and plastic storage containers, and dripped out onto the floor. Good times! (A good excuse to look into buying flour and sugar canisters, instead of leaving them in their paper bags...)

I managed to stay awake long enough last night to eat and watch a show, and went to bed promptly at 8pm. I was asleep before hubs even made it to bed. So, this morning I get up first thing at 7am (the sky is so bright now at that time!) and go for a shower. I'm nude, standing in the cold morning air, in the shower cubicle, and I literally think "It'll be so nice to have a shower... WTF is wrong with the shower head?"

The washers had apparently dried out and shrunk enough over the last three weeks that they no longer were holding the shower head in the right position, so it just drooped sadly. I had to jury rig it (still naked, lol) so that me and hubs could shower without incident, lol. So, I went into town this morning to Charles St Hardware, bought a Fix-a-Tap universal shower washers kit, and fixed it. My name is Mrs. Plumber.

While in town I hit the library, and found several books in the returns section that appealed, and learned my library card had expired. :P That was an easy enough fix, at least. I got books on growing fruit, raising goats, first aid for horses, growing herbs in Australia and a cook and freeze recipe book. Which leads to the next piece of delightful news: We now have a stand alone mini freezer, which is going in right next to the washing machine, and will be the home of extra home grown produce, and any extra meat the fridge/freezer can't hold. It'll be especially useful if I decide to buy a 1/4 lamb carcass again, or help Zara cut up another steer. :P

Last but not least in this series of unfortunate and yet hilarious events (you can tell I'm in a damn good mood, lol), before we left for California, our washing machine stopped working. We just thought it was a loose connection somewhere, but we didn't have time to worry about it, so we had left it, and the full load of washing, until we got back. Well, we just got around to investigating it's issues, and have decided that our faithful old washing machine has croaked. Ian is doing our laundry at FILs house, and we'll go shopping for another machine tomorrow. Not bad for a machine that was already second hand (third hand?) when hubs got a hold of it.

So, that's my update for now, letting everyone know that we're well and safe, and settling back in at home. :)