Thursday, April 7, 2016

F is for Fig- #AtoZChallenge

Today is represented by the letter "F"- and F is for Fig!
My fig tree, 2012. Just a single stick.

Or, more specifically, "fig tree"- because I have one, and I'm extremely proud of its progress over the few short years of its life. Figs are one of my favorite tree fruits, not only because of the sticky sweet treats that grow on their branches, but because they will grow just about anywhere, despite being a Mediterranean plant adapted for hot, dry weather. 

I purchased my specimen at the local nursery. It was the very last one left, had no label at all 9the staff had lost it and couldn't remember what type of fig it was) and it was literally just a short stick when I planted it out in front of the house in 2012.

It is now taller than I am (I am 5'5" in my shoes), and it's only been 4 years! Granted, I didn't water it too often, and it didn't receive any fertilizer until this year when I gave it a bag of horse manure. Since adding the poo, it's grown taller, grown more leaves, and developed a second and even third crop of fruit. I counted up to 70 figs on it a few weeks ago!


It grew two figs in 2012.
It's a productive plant with a "can-do" attitude- even as a short stick it was producing fruit, and continued to do so almost exponentially since 2012.

Figs are pretty easy to care for, at least, and as a self proclaimed "lazy gardener" that's ideal. I have it located in front of a brick wall, where the sun shines all year round to create a heat trap. It's planted beside an ornamental evergreen which acts as a wind break for it, as the wind can blow pretty hard down here. Figs seem to have low water requirements and do well with any fertilizer you care to give them.


2013, it had four or five figs- easily double that of 2012
I recently planted Russian comfrey near it, with the hope of growing it as a crop underneath the fig, to draw up minerals and nutrients from the deeper subsoils, and to use it as compost/fertilizer for the tree itself. Compost is always an on-going project, so of course, everything in my garden will benefit from the comfrey project.

Figs can also be planted in pots if you don't have a reasonable to plant them in ground. Containing the root ball helps to keep the fig tree's vigorous growing habit in check, resulting in more fruit and less leafy growth. My is planted near the road bed, in tough, compacted clay soil. I dug just deep enough to create a hole of reasonable size, and then planted the tree. If the crop is any indicator, this method is working. 

The fruit, of course, can be used for many things, including jams and baked goods. I personally like my figs fresh, and I eat them skin, pulp and all. I have dehydrated them, and find that it works best if you quarter each fig and lay them out on the dryer tray- they dry faster and more thoroughly that way.

My tree, whatever type of fig it is, appears to grow fruit of exceptional size, although I have learned that excessive rain fall will cause them to swell and split. The fruit is a sort of brownish-purple, so your guess is as good as mine as far as variety goes. I harvested at least a dozen massive figures this, and am waiting to see how the second and third crops ripen.

2016: in just four short years, it has grown
taller than the windowsill
My original plan in planting the fig was to train it over the bedroom window in order to create a natural sun blind for our bedroom, which gets very hot in the summer time, as the sun beats down on the front of the house all day. This plan seems to be coming together well, as the tree has finally reached over the window sill. I reckon in the next few year it'll really start making a difference in my "passive climate control" system.

Thank you for you reading my blog this far, and I hope that you too can plant a tree in your garden, for shade, for fruit, and for a unique and interesting plant that can survive almost anything.

I'll see you tomorrow, when I post the next blog!

Wednesday, April 6, 2016

E is for Electrolytes- #AtoZChallenge

I'm going to take a break from telling you about the things I do day-to-day, in order to share a subject that I've researched and studied a bit. Therefore, E is for Electrolytes, and why they are important for your health! 

I'm sure we've all been in situations that called for the consumption of extra electrolytes- I certainly have (food poisoning induced dehydration- not a recommended condition to be in!) One of the problems I experienced during this bout of sickness was the inability to keep anything down, not even water. Why was that?

Basically, my body knew that its electrolytes were out of balance, and it also knew that the continuous consumption of plain water was going to dilute them further, hence the continued need to vomit despite the fact that I hadn't eaten anything else. So, that begs the question:

What are electrolytes anyway? 


As usual, Google is my friend, so I hit it up for a fast definition:
Electrolytes are minerals in your blood and other body fluids that carry an electric charge. Electrolytes affect the amount of water in your body, the acidity of your blood (pH), your muscle function, and other important processes. You lose electrolytes when you sweat.
As you may already know, our bodies run courtesy of electrical signals. Simply put, when you suffer an electrolyte imbalance (such as during a sickness that causes dehydration, or heavy sweating during hot days, especially if you are already drinking lots of plain water) health problems can arise. Signs of an imbalance can include nausea, lethargy, and fluid retention (fun!), but if left untreated, can rapidly get very serious, and even life threatening, including symptoms such as:
  • Confusion or sudden change in behavior
  • Severe muscle weakness
  • Rapid or irregular heartbeat
  • Seizures
  • Chest pain 
For further information and advice on electrolyte imbalance, check this out.

A variety of minerals in your body are responsible for keeping you in good working order, and they include sodium, potassium, calcium, and magnesium. They are necessary for proper muscle and nerve function, for balancing the body's pH, for maintaining a proper heart rhythm, and even serve a role in the production of your DNA.

Most of these minerals can be found in your every day environment, mostly from foods in your diet, but also can come in the form of supplements, or electrolyte drinks, and enterprise which has become a large commercial market thanks to endorsements from famous athletes and sporting events.

Before you hit the drink aisle for the Gatorade, though, I'd like to point out that there are tons of recipes out there for healthy, home made "sports drinks". Don't go for the neon colored, sugar heavy drinks if you can make better ones at home- your body will thank you!


I myself have a simple, plain recipe for an electrolyte drink. The cool part is that I can also use this for my chickens on very hot days where they risk dehydration and heat sickness. It's plain for human tastes, but you can add some fruit juice to it for a little flavor. It's simple to whip up:

1/2 teaspoon salt substitute (optional)
1 teaspoon baking soda
1 teaspoon table salt  
1 tablespoon sugar
4 liters of water

Dissolve the ingredients in a small amount of hot water, then add to the remainder of the (cold) water and stir to mix. For people, mix in some fruit juice and drink through the day as needed, especially if you are working hard. For your chickens on extremely hot days, leave it out (unflavored) in lieu of their normal drinking water for a day, and then switch back to regular plain water when the weather cools off.

So for all you folks getting more active for the spring and summer months ahead, keep this in mind, and keep your electrolytes balanced and replenished when you are working hard! I'll see you again on the next blog. You'll be spared my usual puns, as I can't think of any for "F"!

Tuesday, April 5, 2016

D is for Dessert- #AtoZChallenge

Baked in a 9in round cake pan
Today, D is for Dessert. Because no one can go wrong with that! So I'm going to regale you with one of my favorite recipes: cinnamon rolls!

As delicious as they are, they are definitely a once in a while treat! I like making cinnamon rolls for special occasions usually, like Easter and/or Christmas, and they make a great gift to friends, or as something to bring to a brunch or party.


How thickly you cut the rolls depends on how many people you're feeding. Expect to have at least two round 9inch cake or spring form pans handy, or a 9x13 baking dish. I like having them around as desserts, but I've pretty much eaten them at all hours (which is why I only make them once or twice a year!) They are best hot and gooey, with loads of icing!


Living and Learning's To-Die-For Cinnamon Rolls

Dough:

3 tsp instant yeast
1 cup warm milk
1/2 cup sugar
1/2 cup melted butter
1 tsp salt
2 eggs
4 cups plain flour

Combine ingredients until a soft ball of dough forms. Don't knead too much. Let rise in a warm place until doubled in size. Punch down, and roll into a rectangle approximately 1/2 cm thick.
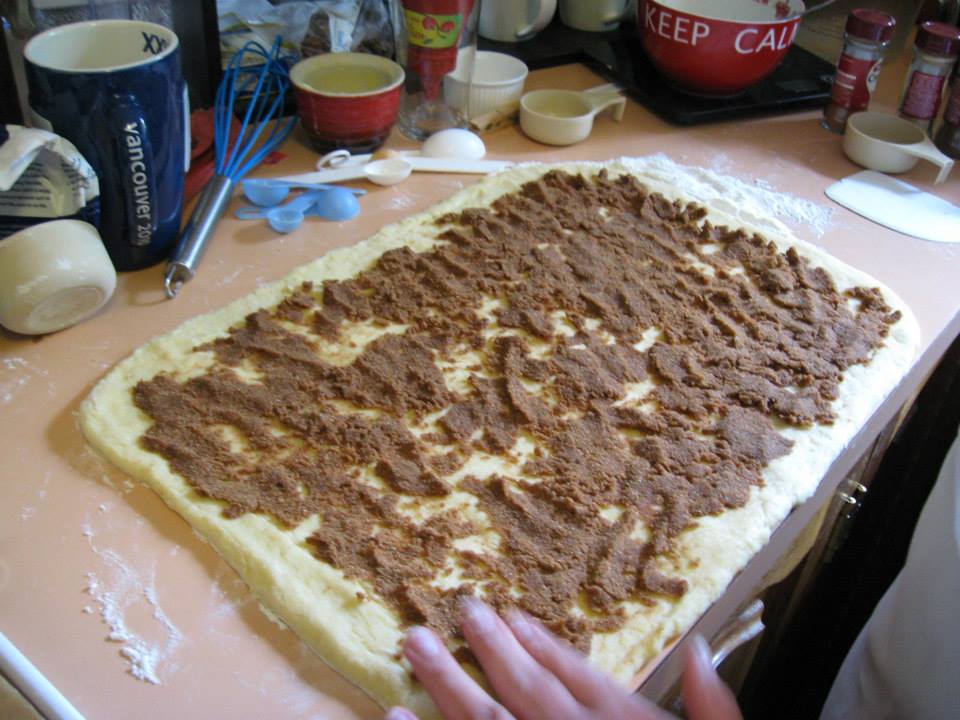
The dough was rolled out with a floured french pin, and
I'm spreading the filling now. Fingers or spoons work just fine.

Filling:

1 cup brown sugar
2+1/2 Tbs cinnamon
1/3 cup softened butter

Cream together and spread over the dough, leaving a 1/2 inch margin on the long side, and spreading all the way to the ends. You might find using your fingers for this to be easier, instead of a spoon.

Roll up the dough into a log, and slice off inch thick pieces. Grease a flat pan and lay them out. Let the pieces proof for an hour or so, then bake in a 190 C oven for 10-15 minutes, or until done. Spread icing on them when they're still hot.

Baked in a large roasting pan here.
Icing:

8 Tbs softened butter
1 cup icing sugar
1/2 cup softened cream cheese
1/2 tsp vanilla extract

Cream all ingredients together, and spread on the rolls while they're hot.

Licking the bowl afterward is mandatory!


I hope you love this recipe as much as my friends and I do. It's probably one of the best "homey" things to bake over the holidays. :) Until tomorrow- keep living and learning!
 

Monday, April 4, 2016

C is for Chickens- #AtoZChallenge

Jago, Chatty, Cinderella, Bo and Cossa.


C is for Chickens! Because I HAVE to show off my fluffy bums! It's like, a rule, you know?

For years, I've always wanted my own chickens, even before I moved to Tasmania and started up with the self reliant urban homestead stuff. Many of my relatives had chickens, and the whole idea of collecting fresh eggs and watching the happy poultry as they foraged was just plain appealing. 

Chookie Chow: a mixture of veggie scraps, seeds, dried
meat, and dried herbs. An excellent chicken snack.
However, I currently live in a suburban unit with a tiny garden, so it wasn't exactly conducive to happy foraging birds. However, an opportunity arrived in the form of a friend purchasing a house that sat on a large block, and one of the first things she said about it was that it had a chicken coop, and that maybe we could have chickens in it. I was thrilled!

Bloomers hiding under the clam shell cover.
Chookie Blocks, a favorite winter poultry treat.
Once she had moved in and gotten herself settled, I went over and investigated the coop area. It was pretty sad, really. It had three intact walls, no back wall or ceiling, and no actual chicken house- it was just a pen. There was also an issue about the new fence going up, as the block next door was being built up with a house, new fencing, etc.

It took several months to sort the various issues out, and for me to get over my procrastination, but I was finally able to get my act together well enough to build a chicken coop. Thanks to a group of my friends, we had a chicken blitz, and using star pickets, free pallets, some other recycled materials and various hardware odds and ends, we got a 1mx1m square elevated chicken house made. Then, when the fence line issues were all worked out, I was able to fix up the pen itself with aviary wire, cattle panel, old timbers, and bird netting. By the time I was finished, it was pretty snug! I just added a few extra touches, and filled the house with straw and perches, and the birds were right at home. Thanks to a local breeder, I picked up several lovely ladies for our new chicken coop. 5 were cross breeds: 1 AustralorpX, 1 SilkieX, 1 Light SussexX, and 2 Buff OrpingtonX or possibly ISA BrownX
- that was never clear. There were later joined by 2 absolutely adorable pure bred silkies, in white and buff orange, the youngest of the lot.


Chatty giving me the stink-eye.
Unfortunately, our Molly girl got sick and no matter what I did to help, she didn't make it. She seemed to rally under treatment, but just didn't have it in her in the end. She is survived by the rest of the flock: Bloomers (brown BuffOX), Jago (black AustraloprX), Cinderella (Light Sussex), Chatty (SilkieX), Bo (white Silkie), and Cossa (buff orange Silkie).

They give us eggs (large brown and small cream colored eggs!), and patrol the garden daily, all day, eating bugs, seeds, weeds, fallen fruit (my friend has mulberries, apples, persimmons, etc) and other goodies. Their favorite treats are snails, sunflower seeds, Chookie Chow (made by yours truly) and, in the winter, Chookie Blocks (I make these from seed mixes, dried fruit, and tallow). They are truly spoiled babies!


Anyway, thanks for hanging around to read my "proud chicken mama" post. Hang about, and check out tomorrows blog! I'm sure it'll be D-lightful!

*Ducks all the thrown rotten tomatoes and exits stage left!*

Saturday, April 2, 2016

B is For Beans- #AtoZChallenge

A Golden Haricot bean pod, just developing.
You've all heard that school yard chant:
"Beans, beans, the magic fruit; the more you eat, the more you toot! Pfffth!"


*snorts* Yeah, sorry. I have the sense of humor of an eight year old sometimes. I could regale you all with truly juvenile tales about beans and their effects (most of them I blame my father and brother for... you know how it goes), but I'll save you that experience and just jump straight to the point: Day 2 of the A to Z Blogging Challenge is all about beans.

A flat, smooth green pod protects its developing seeds on this
Golden Haricot bean vine.
What can I say about beans, apart from the fact that they're used in cooking and give you gas (and bad jokes)?

I know they're an acquired taste (I love green beans! My husband? ... Not so much). Dry beans make my favorite foods, such as spicy beef chili and refried beans (Taco Tuesday just isn't the same without the refried beans, you know what I'm saying?) Dried bean seeds come in an amazing array of colors, sizes, shapes and patterns, so much so that half the time, you just want to display them in glass jars, because they're so pretty.


The first Roger's White Runner seed.
There are many varieties of beans, but all beans are legumes, and belong to a larger family of plants that include alfalfa, clover, peas, lupins, lentils, mesquite, carob, soybeans, peanuts and tamarind. If you want the scientific jargon, check it out at Wikipedia, but I'm trying to keep it simple. 

Of the legumes, beans are very useful plants to us as gardeners and farmers. Most notably, they provide food in the form of young green pods, which can be prepared in numerous ways to make them tasty. The also provide the bean seeds which, when dried thoroughly, store for a long time, making them a perfect bulk food storage option. Both dried beans and pods are components in countless recipes in cultures around the world, and have been for generations.

The flowers are the typical red and white of a scarlet runner
variety- you don't know there's anything special until you
collect the seeds.
Beans are also nitrogen fixers. This means that colonies of special bacteria live on their roots, called nodules, and these take nitrogen from the air and, through a complicated series of chemical reactions, convert it into a form that can be fixed into the soil, which in turn benefits crops that are planted after the beans (or other legume variety). As a result, they're used as a rotational crop, to restore soil nutrients, before the land is sowed again with another type of plant. 

Broad beans, a type of legume that have thick, free standing stalks, and long fleshy pods with large seeds, are commonly used as a green manure crop, allowed to grow tall before they're chopped, dropped and tilled in, to break down and add organic matter to the soil. (A related legume, peas, are grown until they dry out, before they are baled up as straw, for much the same purpose- mulch and compost. Seeing as they're so closely related, I cannot see why beans couldn't be used as straw as well).

One of Roger's White Runners, when it was still in it's pod.
When growing beans, you can choose from several varieties that have three basic growing habits.

Bush beans are squat but productive little plants, requiring no trellis for support, great for kids or very short people who don't have far to bend for the harvest, or for growing in tall raised beds, where bending has been factored out. They grow maybe to knee height- because of this, they are probably my least favorite type to grow in ground. I had several rows of bush beans a couple years ago, and I got real tired of paying homage to those plants, I can tell you. So, personally, I've been phasing my bush bean varieties out in favor of the climbing beans.

Clockwise From Top left: Trail of Tears, Golden Haricot,
Lazy Housewife, and Black Runner
Climbing beans are exactly what they say they are on the packet: they climb. They need a strong string or sturdy trellis to climb up, and given enough water and sunlight, will grow as tall as they can get, which is pretty tall (I reckon some would happily grow 20 feet if you didn't keep them in check).

Broad beans have the third growing habit: free standing. They have thick, rigid stalks which allow them to grow up without need for support. However, this doesn't mean they are indestructable- a strong wind can severely damage your broad beans, tearing them at their joints and knocking them down. Even though they can be grown free standing, I always think it's better to give them something to lean up against for extra support.

I trained my special runner beans up on a trellis,
and yes I am growing them in pots!
My personal garden project this year was to grow a few rare varieties in order to save the seeds for the seed bank project. I planted two types of scarlet runner seeds: a white seed with brown speckling, which I'm calling "Roger's White Runner" (got it from some guy named Roger, obviously); and a pure black seed, which I'm calling the "Black Runner", for the sake of simplicity. I also have a variety that I'm calling a "Golden Haricot": a stunning brown and caramel colored bean.

Unfortunately, we had a heat wave this year that kept them outside of their prime fruit setting temperature for several months (the prime temperature for them to set fruit at is 10C). As a result, my beans were not that successful. Currently, the scarlet runners are putting on a few pods (I have literally harvested one Roger's White Runner seed so far), and the Golden Haricots are just starting to dry out a couple of pods, so I haven't even started collecting them yet.

I do look forward to seeing how many I can grow this autumn though, so there will likely be a follow up post when that time comes. Until then, I'll wrap up this post, and hope you all learned a little something from this blog. :)

C you! (Get it? "See" you? Because the next blog starts with "C"-- yeah, never mind...)

Friday, April 1, 2016

A is for Art- #AtoZChallenge

Woohoo! The first blog for the A-to-Z Challenge, starting out with "A is for Art"! I am so stoked, because to get this month started off right, I'm going to share with you my favorite side hobby: Drawing!

I have been a fan of drawing and coloring for as long as I can remember. The most exciting moment of my 6 year old life (apart from getting my first bike) was being given the Big Box of Crayola Crayons, which I used to carefully color in the mermaids, princesses and animals displayed in my many coloring books. It wasn't long either, before I went from straight coloring to traditional drawing. I distinctly remember, in the 3rd grade, drawing a huge dragon on a piece of notebook paper, flying through the air carrying a heart shaped wreath covered in flowers (it wasn't nearly as sophisticated as it sounds, but for an 8 year old it wasn't a bad composition- I sort of wish it has survived the years).

I've experimented with many techniques of artistic expression over the years, but my long standing absolute favorite, and the one I'm most skilled in, is simple black and white pencil. It's probably the easiest and cheapest, because you literally only need a #2 pencil (or a mechanical pencil- I like those a lot too), a good eraser (the white ones work best) and a piece of paper (I've used a lot of materials for paper- napkins, place mats, lined paper, scratch paper, copy paper, card stock, etc). Nowadays, I use sketchbooks, with fine grained white paper designed for pencil.

Before I got into the technology game, I would draw something, take a picture of it, and upload that into the computer to be processed, at first in paint, then in a Photoshop knock off program. When I got married, I moved up in the world into the system that I use today: Draw a picture, use a flat bed scanner to get it into the computer, then use the mouse and the graphics tablet and stylus to do what I want with it.

What with the rise of "adult" coloring books, I found my inspiration to create my own coloring page designs, as they slotted perfectly into my prime skill zone: pretty patterns, pencil drawings, and black and white images.

People saw my images, became interested in coloring them, and I started getting offers to buy my art. So, a few months ago, I started a page on Facebook called >>Paw Print Works<<. Through that page, I display and sell my art, both the black and white images and the colored versions that I digitally colored and enhanced myself. Friends buy the designs for their kids and themselves, and I love it when they share their finished coloring pages. 

Drawing is sometimes a slow process, and inspiration is often a fickle beast, so I don't have many designs published yet, but if you are interested, check out my page, like, comment, share with your friends, and help support an artist (me!)

Not only that, but through a friend of mine at >>8th Dimension<<, I have my art "published" as apparel and housewares art on RedBubble. << Check out that link and buy something cool and unique.

Also, check out >>14th Street<< on Amazon and buy a shirt or two; they're displaying my art as well. There you can find "Scorpio", "Phoenix", "Serpent Crest" and the "Chimera" patterns, in a variety of tee shirt fits, sizes and colors.

Now that I'm finished shamelessly selling my work, I just want to add that every purchase goes towards my income. My hobbies are my job, and that means my art, soaps, hand crafts, the vegetables I grow, and even the seeds I collect, all benefit from their sales. All money is put towards production and further development of what I hope one day will be a booming business.

Until tomorrow then-
Cheers!

Thursday, March 31, 2016

The A-to-Z Blogging Challenge 2016

Guess what? For the first time ~EVER~ Living and Learning will be participating in the A-to-Z Challenge in April!

What does this mean?

It means you can look forward to 26 days of interesting and hopefully educational blogs on a wide variety of subjects. Most will apply to my usual range of subjects regarding gardening, sustainability, crafting, etc, but I may even throw in a few opinion pieces, and show you snippets from my life outside of the blog-o-sphere I live in when writing posts. 

When does this Challenge begin? 

April 1st. And that's no joke!... -yeah, okay, that one was pretty bad. Sorry. Anyway- I'll be writing a blog every day but Sundays (because I need some time to regain my sanity after all the writing, of course!)

I hope you all enjoy reading my posts, and please comment, like, and share on your favorite social media sites.

Live, Learn and Love!